1.1 Gitlab安装部署及基础操作
1.1.1 系统环境的准备
由于哥们的系统是CentOS 8.0 所有此次安装的系统CentOS 8.0 本人还是建议使用CentOS 7.5或者7.6 CentOS8系统才发布不久 不太稳定
实例1-1 系统环境的准备(由于我们的系统是最小安装的所以很多命令没有安装)
1.1.1.2 查看系统版本
[root@bogon ~]# cat /etc/redhat-release
CentOS Linux release 8.0.1905 (Core)
1.1.1.3 安装系统一下常用的命令
[root@bogon ~]# yum -y install vim bash-completion lrzsz wget net-tools
1.1.1.4 优化系统的yum源 使用阿里云
[root@bogon ~]# egrep -v "^#|^quot; /etc/yum.repos.d/CentOS-AppStream.repo
[AppStream]
name=CentOS-$releasever - AppStream
baseurl=https://mirrors.aliyun.com/centos/$releasever/AppStream/$basearch/os/
gpgcheck=1
enabled=1
gpgkey=file:///etc/pki/rpm-gpg/RPM-GPG-KEY-centosofficial
[root@bogon ~]# egrep -v "^#|^quot; /etc/yum.repos.d/CentOS-Base.repo
[BaseOS]
name=CentOS-$releasever - Base
baseurl=https://mirrors.aliyun.com/centos/$releasever/BaseOS/$basearch/os/
gpgcheck=1
enabled=1
gpgkey=file:///etc/pki/rpm-gpg/RPM-GPG-KEY-centosofficial
[root@bogon ~]# egrep -v "^#|^quot; /etc/yum.repos.d/CentOS-Extras.repo
[extras]
name=CentOS-$releasever - Extras
baseurl=https://mirrors.aliyun.com/centos/$releasever/extras/$basearch/os/
gpgcheck=1
enabled=1
gpgkey=file:///etc/pki/rpm-gpg/RPM-GPG-KEY-centosofficial
yum makecache
yum repolist
yum update
sed -i 's/SELINUX=enforcing/SELINUX=disabled/' /etc/selinux/config
grep SELINUX=disabled /etc/selinux/config
setenforce 0
[root@bogon ~]# yum -y install epel-release1.1.2 Gitlab开始实施部署
1.1.2.1 Gitlab 是什么
GitLab一个开源的git仓库管理平台,方便团队协作开发、管理。在GitLab上可以实现完整的CI(持续集成)、CD(持续发布)流程。而且还提供了免费使用的Plan,以及免费的可以独立部署的社区版本(https://gitlab.com/gitlab-org/gitlab-ce )。
由于gitlab上目前没有centos8 的源所有本次使用docker安装
1.1.2.2 搜索yum源上是否有docker
[root@bogon ~]# yum search docker 上次元数据过期检查:0:04:16 前,执行于 2019年11月25日 星期一 20时29分22秒。 ======================================================================================= 名称 和 小结 匹配:docker ======================================================================================== podman-docker.noarch : Emulate Docker CLI using podman pcp-pmda-docker.x86_64 : Performance Co-Pilot (PCP) metrics from the Docker daemon standard-test-roles-inventory-docker.noarch : Inventory provisioner for using docker =========================================================================================== 名称 匹配:docker ============================================================================================ docker-ce.x86_64 : The open-source application container engine docker-ce.x86_64 : The open-source application container engine docker-ce-cli.x86_64 : The open-source application container engine docker-ce-cli.x86_64 : The open-source application container engine docker-ce-selinux.noarch : SELinux Policies for the open-source application container engine =========================================================================================== 小结 匹配:docker ============================================================================================ oci-umount.x86_64 : OCI umount hook for docker oci-systemd-hook.x86_64 : OCI systemd hook for docker skopeo.x86_64 : Inspect Docker images and repositories on registries1.1.2.3 下载docker-ce
curl https://download.docker.com/linux/centos/docker-ce.repo -o /etc/yum.repos.d/docker-ce.repo1.1.2.4 yum 安装docker 报错
[root@bogon ~]# yum -y install docker-ce CentOS-8 - AppStream 3.6 kB/s | 4.3 kB 00:01 CentOS-8 - Base 3.6 kB/s | 3.9 kB 00:01 CentOS-8 - Extras 1.4 kB/s | 1.5 kB 00:01 Docker CE Stable - x86_64 15 kB/s | 21 kB 00:01 Extra Packages for Enterprise Linux 8 - x86_64 5.1 kB/s | 10 kB 00:02 错误: 问题: package docker-ce-3:19.03.5-3.el7.x86_64 requires containerd.io >= 1.2.2-3, but none of the providers can be installed - cannot install the best candidate for the job - package containerd.io-1.2.10-3.2.el7.x86_64 is excluded - package containerd.io-1.2.2-3.3.el7.x86_64 is excluded - package containerd.io-1.2.2-3.el7.x86_64 is excluded - package containerd.io-1.2.4-3.1.el7.x86_64 is excluded - package containerd.io-1.2.5-3.1.el7.x86_64 is excluded - package containerd.io-1.2.6-3.3.el7.x86_64 is excluded (try to add '--skip-broken' to skip uninstallable packages or '--nobest' to use not only best candidate packages)1.1.2.5 Docker 错误信息处理
提示信息中告诉我们需要containerd.io依赖
yum -y install https://download.docker.com/linux/fedora/30/x86_64/stable/Packages/containerd.io-1.2.6-3.3.fc30.x86_64.rpm再重新安装
[root@bogon ~]# yum -y install docker-ce、1.1.2.6 配置docker镜像加速器
[root@bogon ~]# cat /etc/docker/daemon.json { "registry-mirrors": ["https://registry.docker-cn.com","http://hub-mirror.c.163.com"] }1.1.2.7 启动docker
[root@bogon ~]# systemctl start docker.service [root@bogon ~]# systemctl enable docker.service Created symlink /etc/systemd/system/multi-user.target.wants/docker.service → /usr/lib/systemd/system/docker.service. [root@bogon ~]# systemctl enable docker.service [root@bogon ~]#1.1.2.8 下载docker的gitlab镜像
#gitlab 镜像的拉去
gitlab-ce为稳定版本,后面不填写版本则默认pull最新latest版本
docker pull gitlab/gitlab-ce:11.10.4-ce.0
1.1.2.9 创建GitLab 的配置 (etc) 、 日志 (log) 、数据 (data) 放到容器之外,
[root@bogon ~]# mkdir -p /app/gitlab/config [root@bogon ~]# mkdir -p /app/gitlab/log [root@bogon ~]# mkdir -p /app/gitlab/data1.1.2.10 运行gitlab镜像
[root@bogon gitlab]# docker run -d -p 443:443 -p 80:80 -p 222:22 --name gitlab --restart always -v /app/gitlab/config:/etc/gitlab -v /app/gitlab/logs:/var/log/gitlab -v /app/gitlab/data:/var/opt/gitlab gitlab/gitlab-ce f299eb372452d3b59a319eaa71588a0ddbd8d13cb3a894198d6ded58186d5bb7# -d:后台运行
# -p:将容器内部端口向外映射
# –name:命名容器名称
# -v:将容器内数据文件夹或者日志、配置等文件夹挂载到宿主机指定目录
1.1.3 安装完毕配置gitlab
按上面的方式,gitlab容器运行没问题,但在gitlab上创建项目的时候,生成项目的URL访问地址是按容器的hostname来生成的,也就是容器的id。作为gitlab服务器,我们需要一个固定的URL访问地址,于是需要配置gitlab.rb(宿主机路径:/app/gitlab/config/gitlab.rb)
1.1.3.1 添加一下几项配置
[root@bogon gitlab]# egrep -v "^#|^quot; /app/gitlab/config/gitlab.rb
gitlab_rails['gitlab_ssh_host'] = '172.31.208.61'
gitlab_rails['gitlab_shell_ssh_port'] = 22 # 此端口是run时22端口映射的222端口
external_url 'http://172.31.208.61'1.1.3.2 进入容器加载配置
docker exec -it gitlab /bin/bash 进去gitlab容器的命令 gitlab-ctl reconfigure 重置gitlab客户端的命令1.1.3.3 重启一下gitlab容器
[root@bogon gitlab]# docker restart gitlab gitlab [root@bogon gitlab]#1.1.3.4 配置防火墙的规则
#停止firewalld服务
systemctl stop firewalld
#禁用firewalld服务
systemctl mask firewalld
1.1.3.5 编写防火墙脚本
[root@bogon ~]# cat iptables.sh #!/bin/sh iptables -P INPUT ACCEPT iptables -F iptables -X iptables -Z iptables -A INPUT -i lo -j ACCEPT iptables -A INPUT -p tcp --dport 22 -j ACCEPT iptables -A INPUT -p tcp --dport 222 -j ACCEPT iptables -A INPUT -p tcp --dport 21 -j ACCEPT iptables -A INPUT -p tcp --dport 80 -j ACCEPT iptables -A INPUT -p tcp --dport 443 -j ACCEPT iptables -A INPUT -p icmp --icmp-type 8 -j ACCEPT iptables -A INPUT -m state --state RELATED,ESTABLISHED -j ACCEPT iptables -P INPUT DROP iptables -P OUTPUT ACCEPT iptables -P FORWARD DROP service iptables save systemctl restart iptables.service1.1.4 gitlab 开始使用
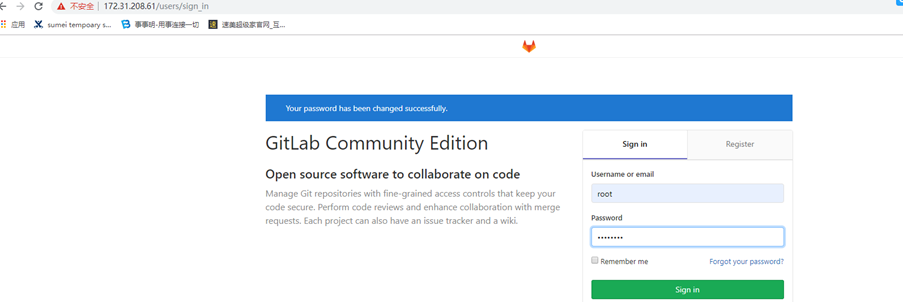
1.1.4.1 登录GitLab
在浏览器的地址栏中输入ECS服务器的公网IP即可登录GitLab的界面,第一次登录使用的用户名和密码为 root 和 123456.com http://172.31.208.611.1.4.2 新建项目
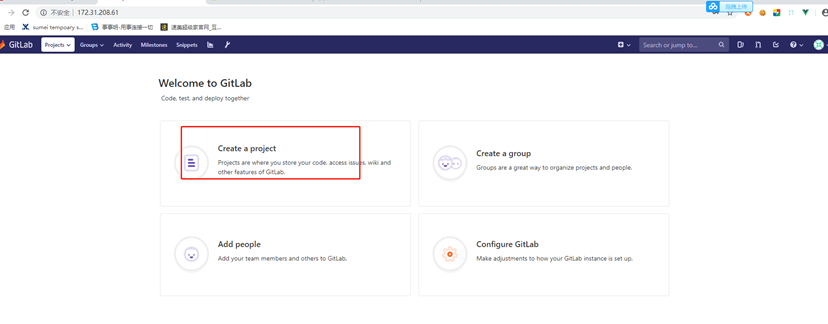
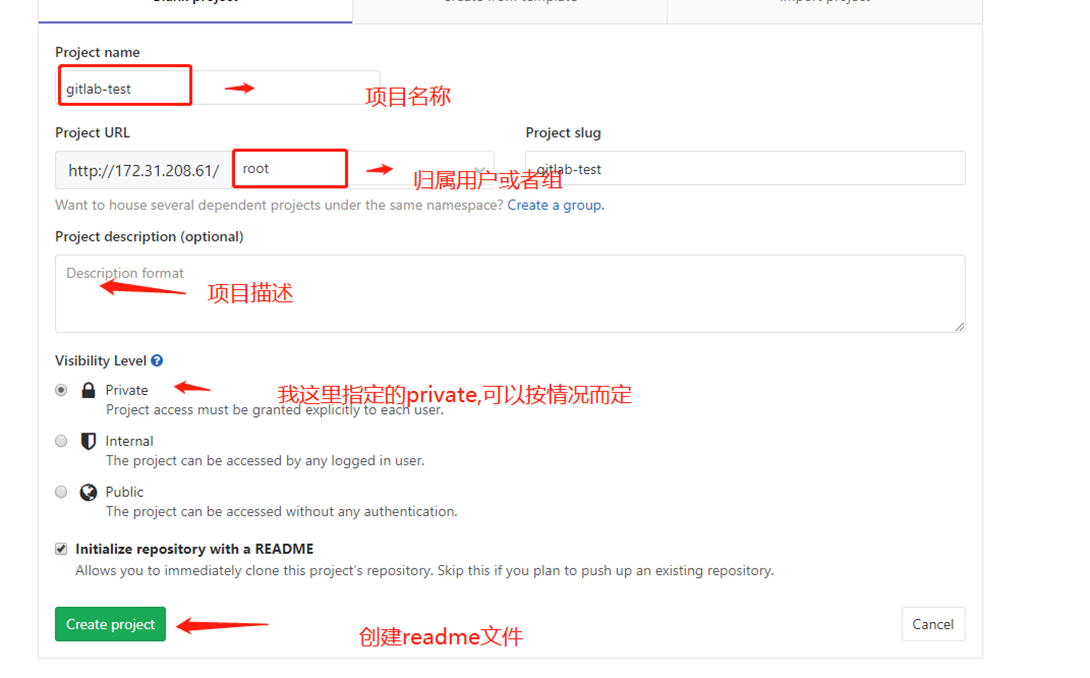
1.1.4.3 项目创建完成
1.1.5 用户使用
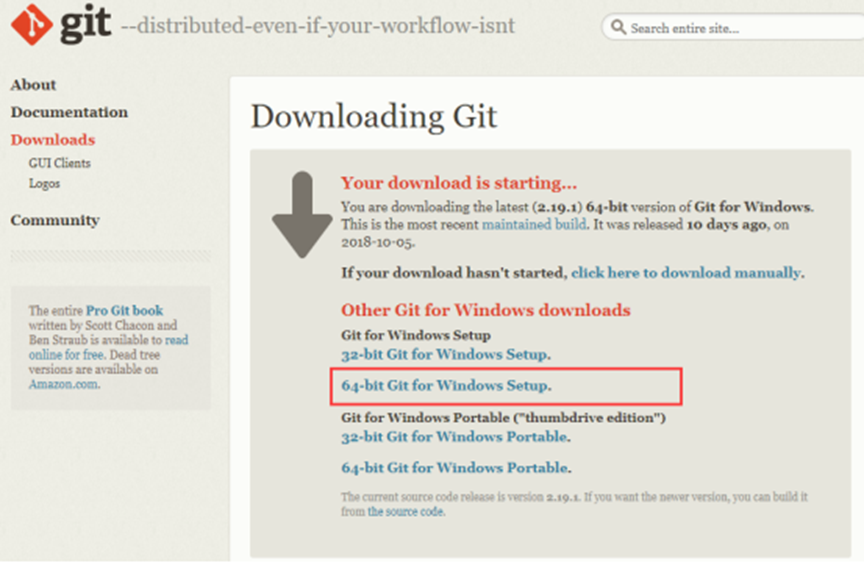
1.1.5.1 下载git.exe
下载地址:https://git-scm.com/download/win 这里是下载64位的
1.1.5.2 2.安装步骤
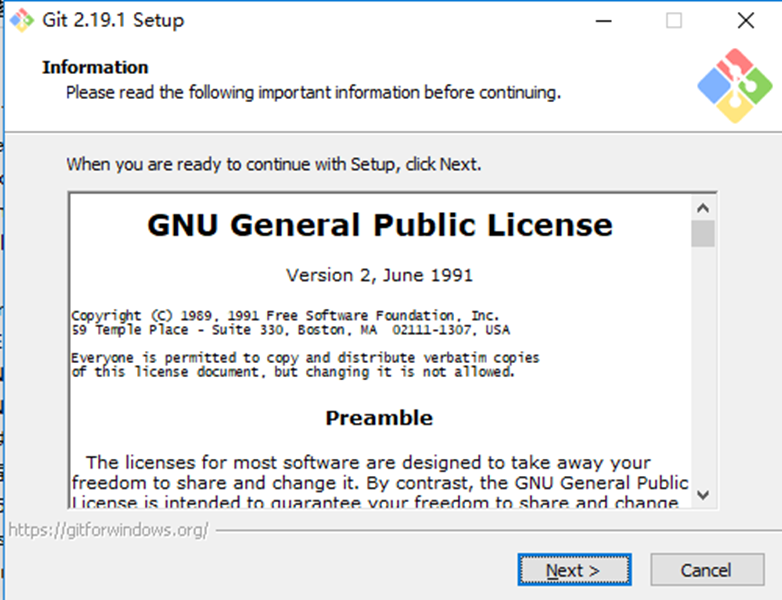
(1)下载完成得到一个exe文件,双击傻瓜式安装
1.1.5.3 开始安装
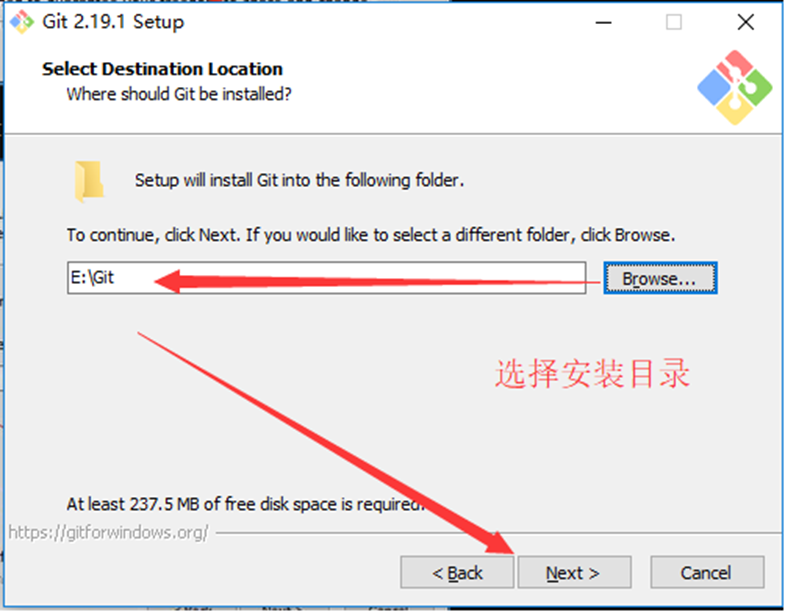
1.1.5.4
选择安装的工作目录
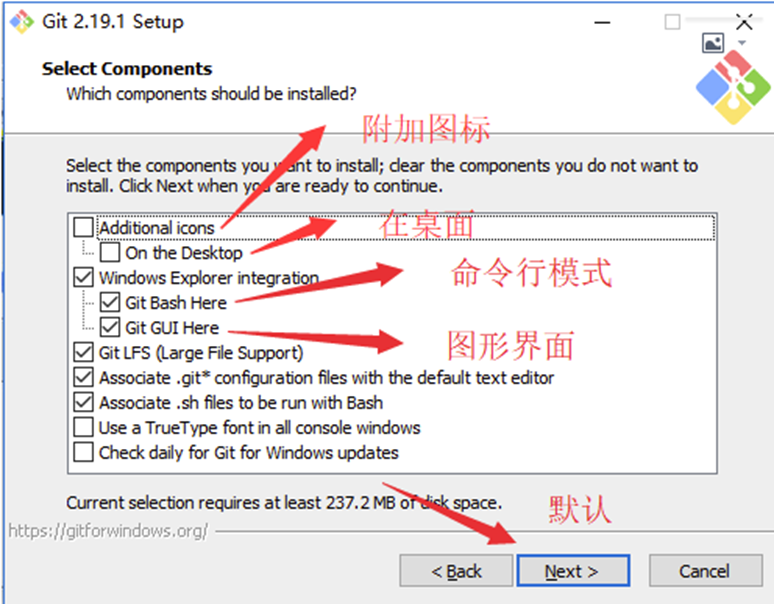
1.1.5.5 默认选项,点击下一步
———————————-
Additional icons 附加图标
On the Desktop 在桌面上
Windows Explorer integration Windows资源管理器集成鼠标右键菜单
Git Bash Here:命令行模式
Git GUI Here:图形界面
Git LFS (Large File Support):大文件支持
Associate .git* configuration files with the default text editor:将 .git 配置文件与默认文本编辑器相关联
Associate .sh files to be run with Bash:将.sh文件关联到Bash运行
Use a TrueType font in all console windows:在所有控制台窗口中使用TrueType字体
Check daily for Git for Windows updates:每天检查Git是否有Windows更新
——————————————–
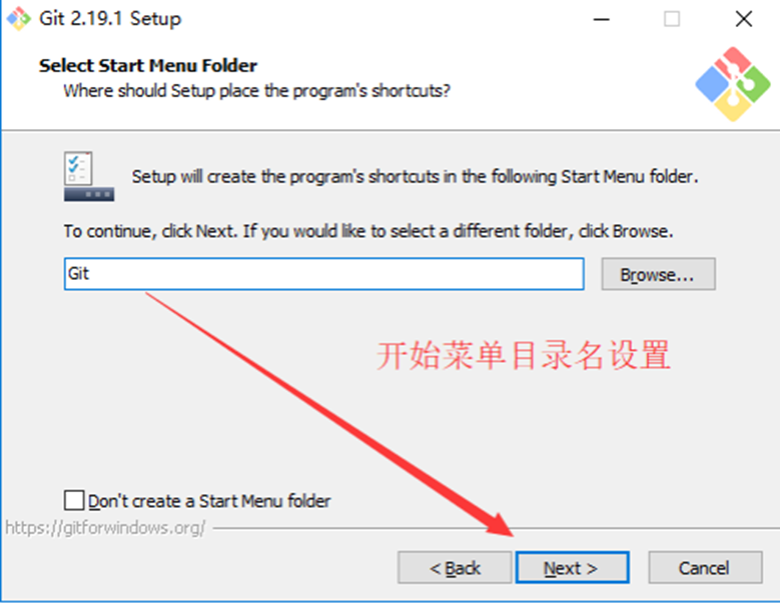
1.1.5.6 开始菜单目录名设置
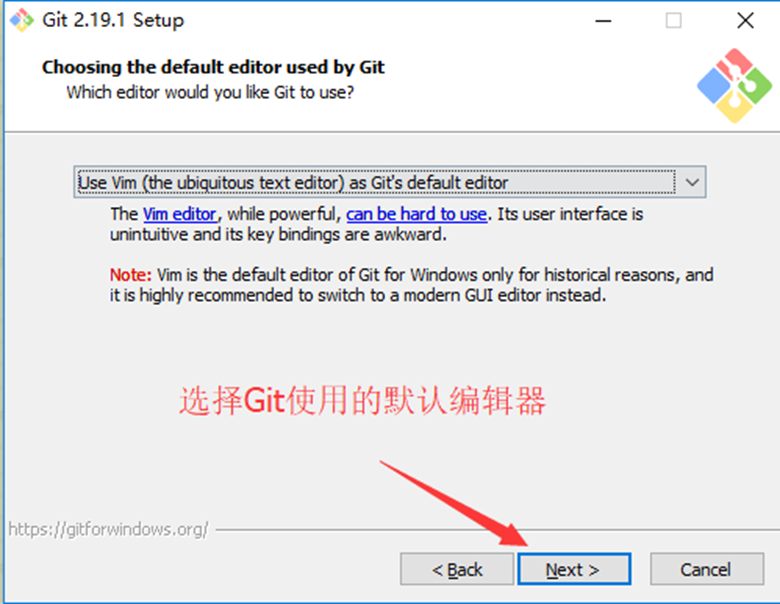
1.1.5.7 选择Git使用的默认编辑器
——————————–
Use the Nano editor by default(默认使用 Nano 编辑器)
Use Vim (The ubiquitous text editor) as Git’s default editor(使用 Vim 作为 Git 的默认编辑器)
Use Notepad++ as Git’s default editor(使用 Notepad++ 作为 Git 的默认编辑器)
Use Visual Studio Code as Git’s default editor(使用 Visual Studio Code 作为 Git 的默认编辑器)
———————
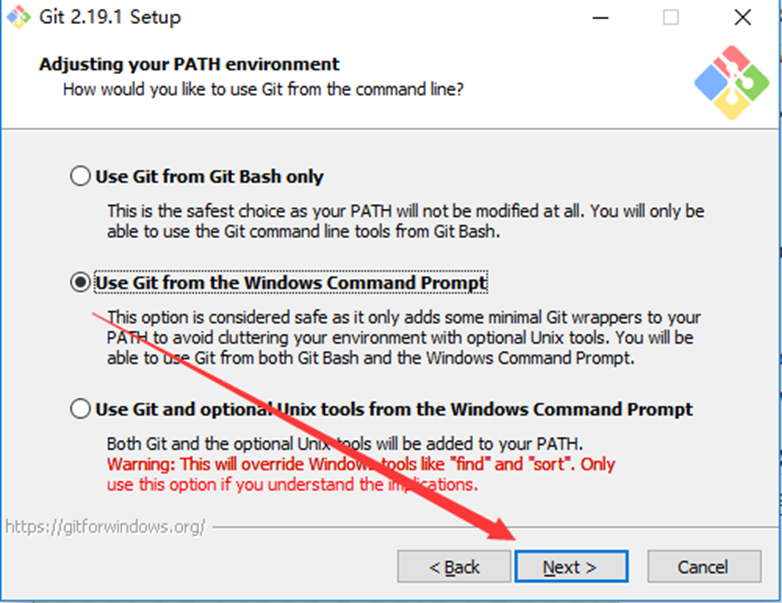
1.1.5.8 配置Path环境
——————————–
–>这是最安全的选择,因为您的PATH根本不会被修改。您只能使用 Git Bash 的 Git 命令行工具。
–>这个选项被认为是安全的,因为它只向PATH添加一些最小的 Git包,以避免使用可选的Unix工具混淆环境。 您将能够从 Git Bash 和 Windows 命令提示符中使用 Git。
–>Git和可选的Unix工具都将添加到您计算机的 PATH 中
–>警告:这将覆盖Windows工具,如 “ find 和 sort ”。只有在了解其含义后才使用此选项。
———————————–
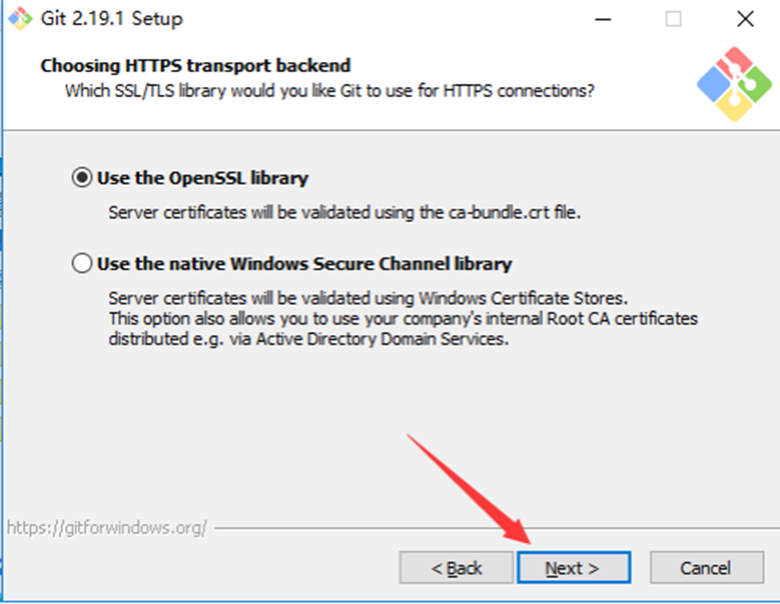
1.1.5.9 选择HTTPS传输后端
———————
–>使用 OpenSSL 库:服务器证书将使用ca-bundle.crt文件进行验证。
–>使用本地 Windows 安全通道库:服务器证书将使用Windows证书存储验证。此选项还允许您使用公司的内部根CA证书,例如, 通过Active Directory Domain Services 。
————————
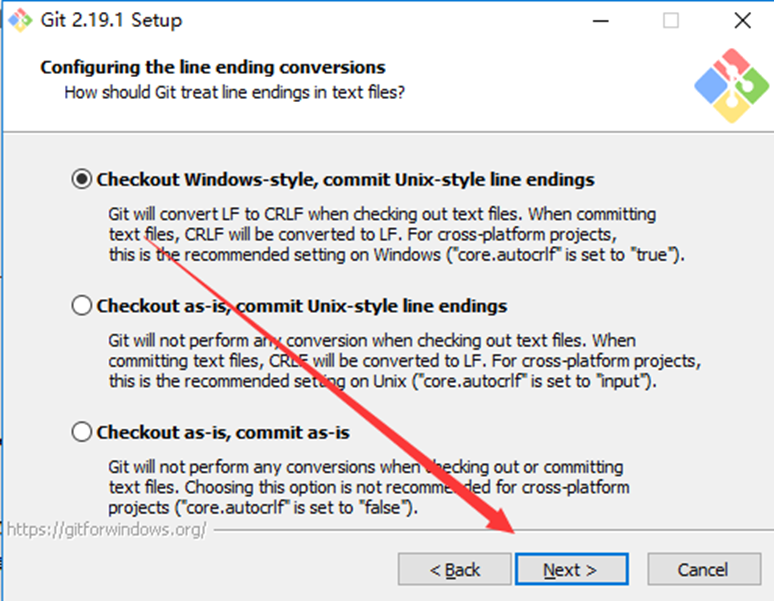
1.1.5.10 配置行结束转换
———-
–>在检出文本文件时,Git会将LF转换为CRLF。当提交文本文件时,CRLF将转换为LF。 对于跨平台项目,这是Windows上推荐的设置(“core.autocrlf”设置为“true”)
–>在检出文本文件时,Git不会执行任何转换。 提交文本文件时,CRLF将转换为LF。 对于跨平台项目,这是Unix上的推荐设置 (“core.autocrlf”设置为“input”)
–>在检出或提交文本文件时,Git不会执行任何转换。对于跨平台项目,不推荐使用此选项(“core.autocrlf”设置为“false”)
—————-
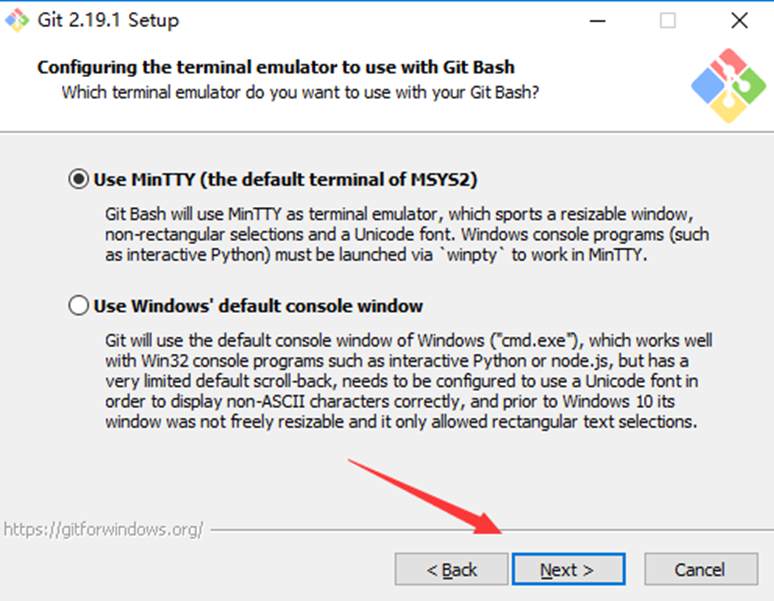
1.1.5.11 配置终端模拟器以与 Git Bash 一起使用
——————–
–>Git Bash将使用MinTTY作为终端模拟器,该模拟器具有可调整大小的窗口,非矩形选区和Unicode字体。 Windows控制台程序(如交互式Python)必须通过‘winpty’启动才能在MinTTY中运行。
–>Git将使用Windows的默认控制台窗口(“cmd.exe”),该窗口可以与Win32控制台程序(如交互式Python或node.js)一起使用,但默认的回滚非常有限,需要配置为使用unicode 字体以正确显示非ASCII字符,并且在Windows 10之前,其窗口不能自由调整大小,并且只允许矩形文本选择。
————————
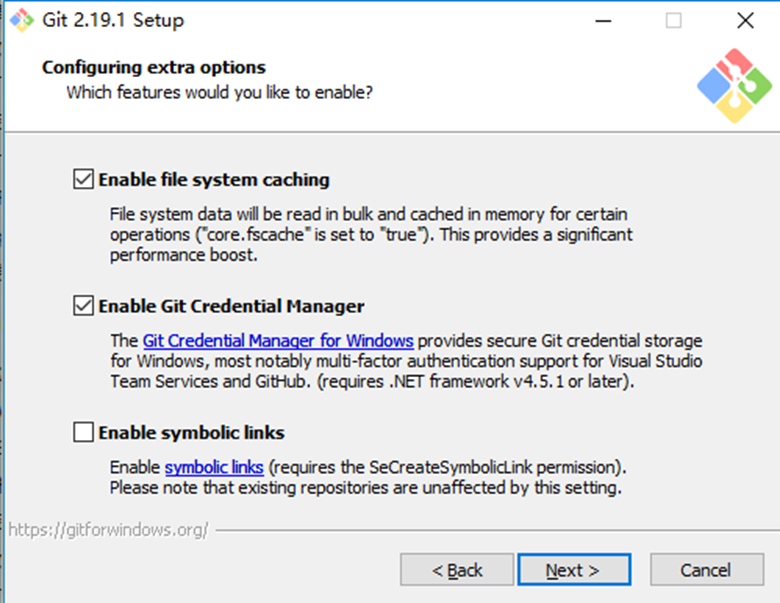
1.1.5.12 配置额外的选项
–>启用文件系统缓存:文件系统数据将被批量读取并缓存在内存中用于某些操作(“core.fscache”设置为“true”)。 这提供了显着的性能提升。
–>启用Git凭证管理器:Windows的Git凭证管理器为Windows提供安全的Git凭证存储,最显着的是对Visual Studio Team Services和GitHub的多因素身份验证支持。 (需要.NET Framework v4.5.1或更高版本)。
–>启用符号链接:启用符号链接(需要SeCreateSymbolicLink权限)。请注意,现有存储库不受此设置的影响。
———————————
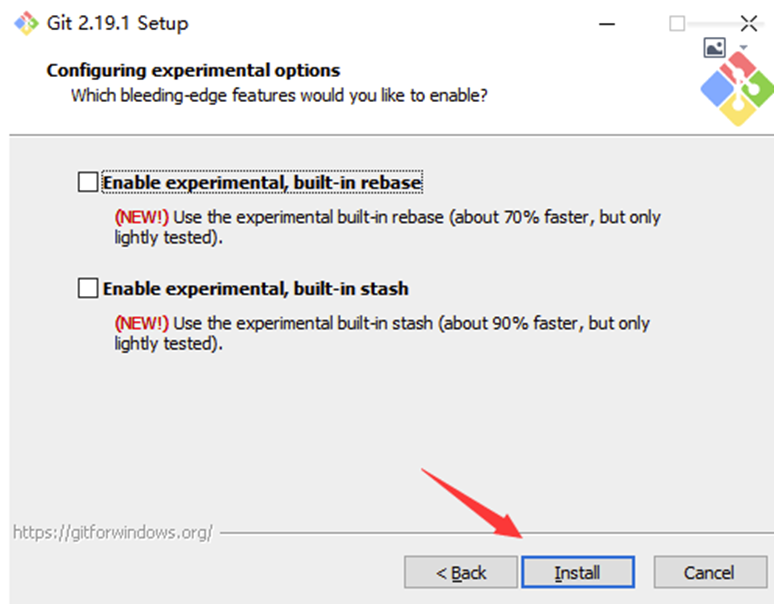
1.1.5.13 配置实验选项
–>enable experimental ,builtt-in rebase(使实验、建库在基础上)
–>enable experimental ,builtt-in stash(在栈中启用实验)
1.1.5.14 安装
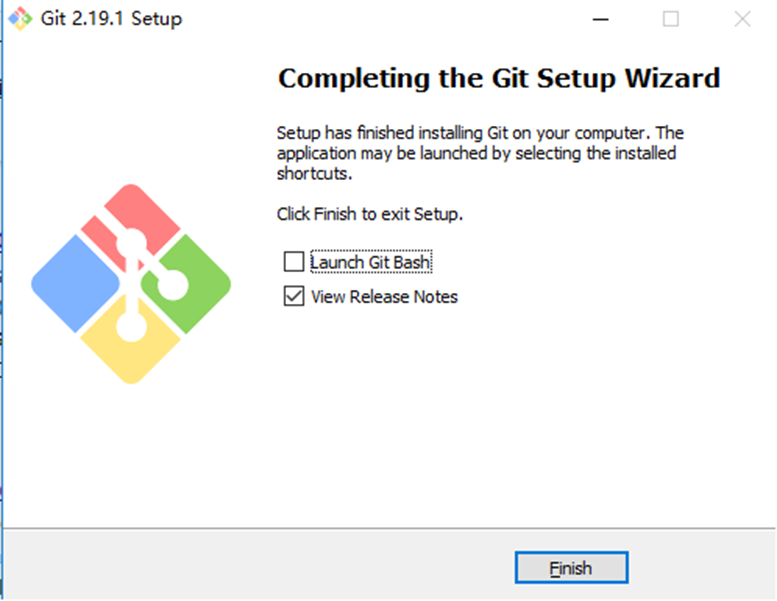
1.1.5.15 安装完成
1.1.5.16 检验是否安装成功
回到电脑桌面,鼠标右击如果看到有两个git单词则安装成功;
1.1.6 客户端的key使用
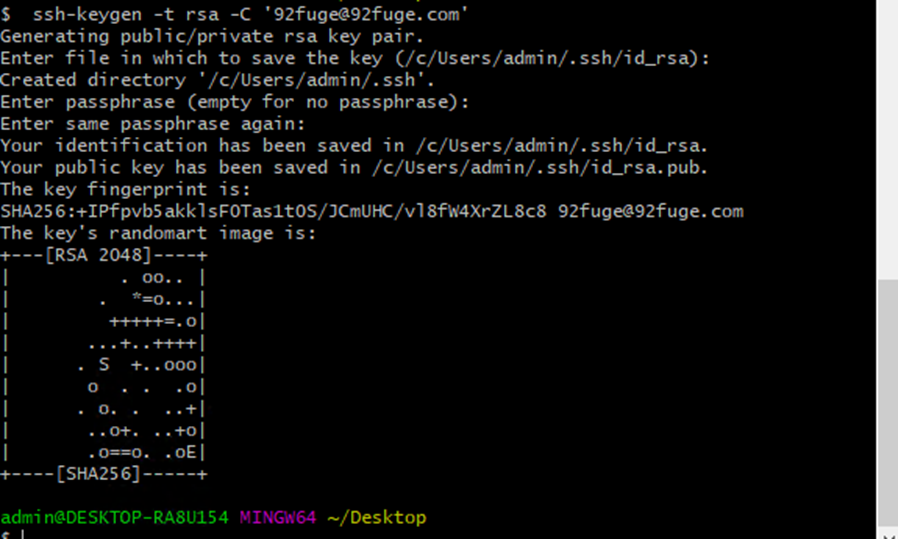
1.1.6.1 打开本地git bash,使用如下命令生成ssh公钥和私钥对
ssh-keygen -t rsa -C ‘xxx@xxx.com’
然后一路回车(-C 参数是你的邮箱地址)
1.1.6.2 表示用户目录,比如我的windows就是C:\Users\Administrator,并复制其中的内容
cat ~/.ssh/id_rsa.pub
1.1.6.3 打开gitlab,找到Profile Settings–>SSH Keys—>Add SSH Key,并把上一步中复制的内容粘贴到Key所对应的文本框
1.1.7 从gitlab克隆代码
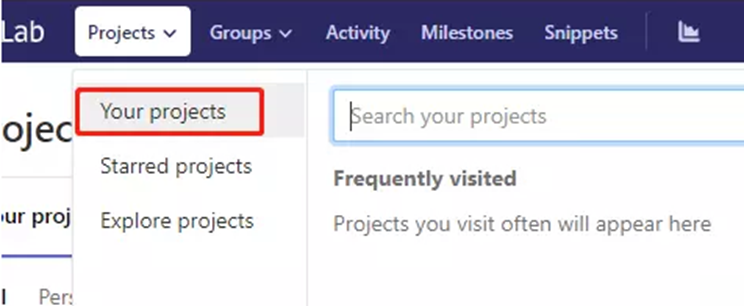
1.1.7.1 回到gitlab页面点击projects->your projects
1.1.7.2 选择一个需要克隆的项目,进入
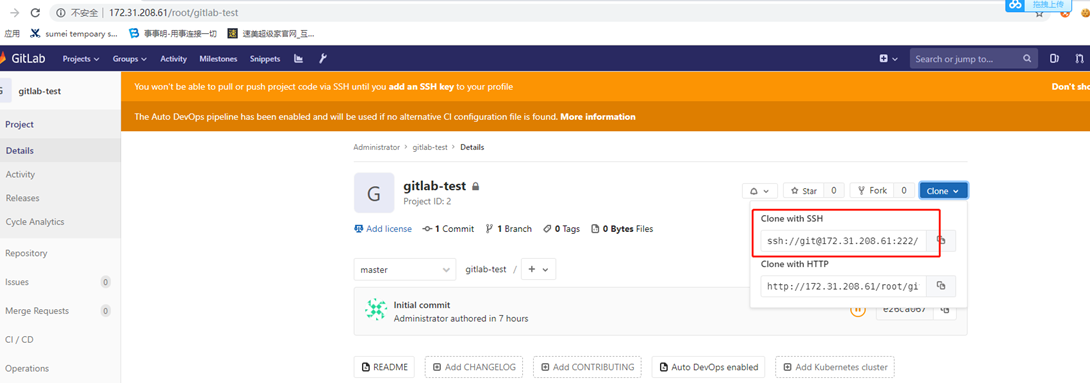
1.1.7.3 进入新建的项目
1.1.7.4 选择克隆的协议(http 或者ssh) ssh://git@172.31.208.61:222/root/gitlab-test.git
1.1.7.5 设置用户名和邮箱
nbsp;git config --global user.name "你的名字"
nbsp;git config --global user.email "你的邮箱"
1.1.7.6 在客户端上克隆代码
nbsp;git clone ssh://git@172.31.208.61:222/root/gitlab-test.git
Cloning into 'gitlab-test'...
The authenticity of host '[172.31.208.61]:222 ([172.31.208.61]:222)' can't be established.
ECDSA key fingerprint is SHA256:ajWpG7WYzCaKIuYm0lpObJeE/7EJ513gR3BQ2NSMxus.
Are you sure you want to continue connecting (yes/no)? yes
Warning: Permanently added '[172.31.208.61]:222' (ECDSA) to the list of known hosts.
remote: Enumerating objects: 3, done.
remote: Counting objects: 100% (3/3), done.
remote: Total 3 (delta 0), reused 0 (delta 0)
Receiving objects: 100% (3/3), done.1.1.7.7 查看projects文件夹,项目已经克隆下来了
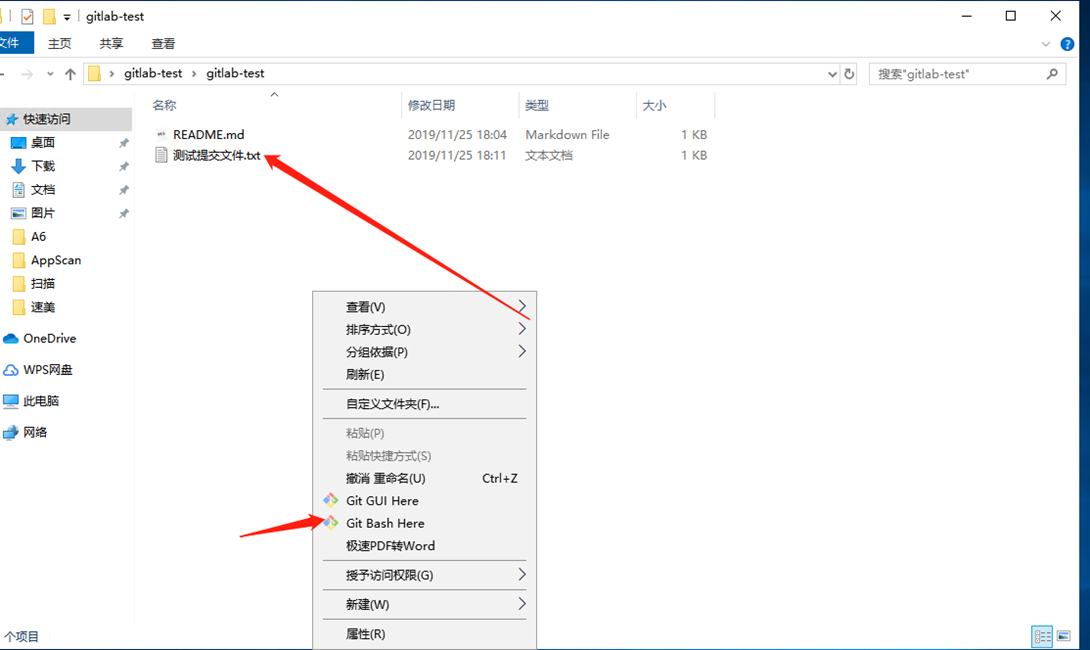
1.1.7.8提交代码到gitlab 查看同步状态 在项目文件夹下右键点击->Git Bash Here
nbsp;git status
On branch master
Your branch is up to date with 'origin/master'.
Untracked files:
(use "git add <file>..." to include in what will be committed)
"\346\265\213\350\257\225\346\217\220\344\272\244\346\226\207\344\273\266.txt"
nothing added to commit but untracked files present (use "git add" to track)1.1.7.9 提交代码
1.1.7.10 命令提交并添加提交信息
1.1.7.11 推送到gitlab服务器
git push origin master
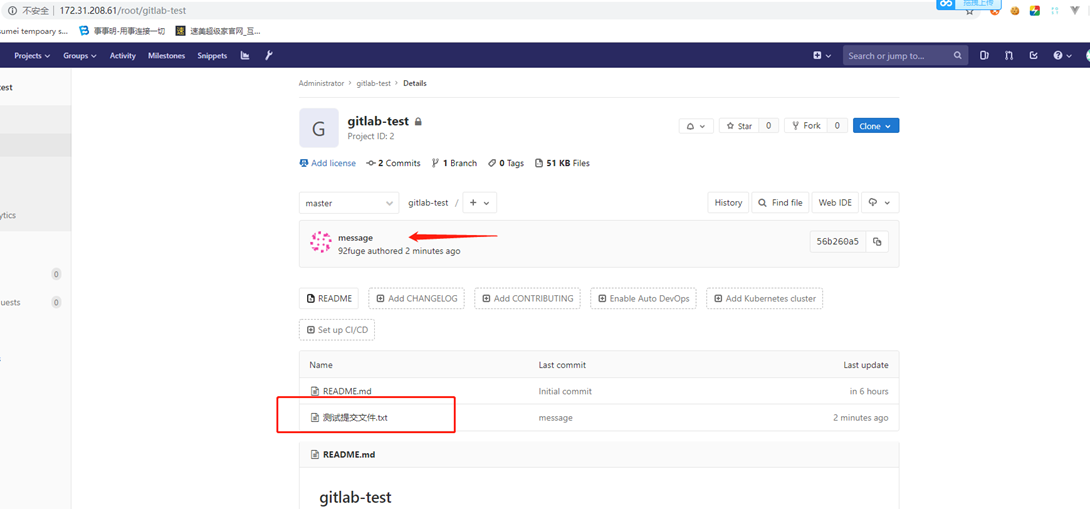
1.1.7.12 检查gitlab是否多了
------本页内容已结束,喜欢请分享------
感谢您的来访,获取更多精彩文章请收藏本站。
















暂无评论内容